If you’re looking to make stand-out, one-of-a-kind Jesmonite pieces, then you’re going to fall in love with terrazzo! In the past year, terrazzo home decor has seen a huge spike in popularity and this is only set to continue in 2022 as the trend develops and evolves. From coloured terrazzo chips to crushed sea shells, you’ll find your end result is a piece that’s completely unique and mesmerizingly beautiful.
Don’t let the elaborate title put you off! Terrazzo is really fun, and when you get going with your colour combos, you’ll find there’s loads you want to try! With that in mind, it’s time to experiment with your first terrazzo creation!
WHAT YOU NEED
- Something to cover your work surfaces
- 1x clean, dry cup or mixing jug
- Weighing scales
- 1x mixing stick
- Plastic sheet or baking paper
- Jesmonite AC100 Base & Liquid
- Jesmonite pigments
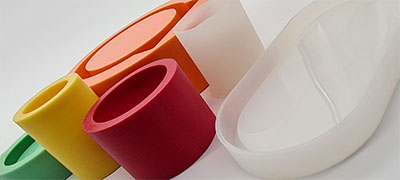
- 1x silicone mould
MAKING YOUR TERRAZZO CHIPS
- Make sure you cover your work surface before you start. Lay out your plastic sheet or baking paper flat on your work surface. Your plastic sheet or baking paper should be large enough for the amount of terrazzo chips you want to make. If in doubt, go bigger! It’s better to have too much space than not enough.
- Measure out your Jesmonite liquid as you usually would using your weighing scales. The amount you measure will determine how big your terrazzo batch is going to be so it’s totally up to you how much you want to make, just remember your base to liquid ratio is 2.5:1. We’d suggest starting with 100 grams of liquid to keep it simple.
- To make terrazzo chips we’re going to be making block colours so now is the time to add your pigments to your liquid. You can make these whatever colour you like and if you need some colour inspo, you can check out our colour mixing guide *here*. You can add up to 2% of the overall weight (the powder and liquid added together) in pigments to your liquid. If you want to make more than one colour, we’d recommend completing the whole process one colour at a time, ensuring you clean your mixing jug each time. Once your pigment has been added, give it a stir to combine it with the liquid.
- Once you’ve got the colour you want to achieve, you need to add your base powder to your coloured liquid (see how to work out your base to liquid ratio here). Now it’s time to mix it up to get rid of any lumps of powder. You can mix for up to 15 minutes if you want, and your Jesmonite mixture will still be fine to use, so don’t rush this step.
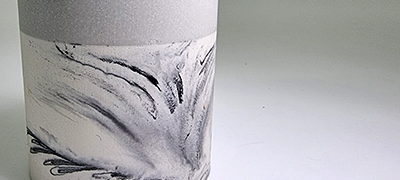
- When you have a nice, lump free mixture that’s about the thickness of double cream, you can pour it out onto your plastic sheet or baking paper. Spread it out thinly using your mixing stick. Imagine you’re glazing a cake. It needs to be thick enough to cover the sheet with no gaps showing through, but not so thick that it won’t snap easily. Around 1 mm is a good guide.
- After around 50 minutes your sheet of Jesmonite will be ready to crunch up. This is the super fun and satisfying bit! Fold your plastic sheet or baking paper over a few times to snap the Jesmonite in various places and get stuck in! You can continue breaking the pieces up with your hands until they’re small enough to use as terrazzo chips. They will come out in a variety of shapes and sizes, which is great as it’ll give your piece more points of interest!
Pro Tip: A pestle and mortar is really good for crushing terrazzo chips and will save your fingers!
MAKING YOUR FINISHED TERRAZZO PIECE
- Mix your Jesmonite liquid and base, adding any pigments you fancy. If you need help with this, take a look at our Starter Guide to get you going. Tap your mixing cup on your work surface to help get rid of any air bubbles.
- Add your terrazzo chips to your mixture. We’d recommend adding 25% of the overall weight (liquid and powder) to your mixture but it’s very much personal preference. We find 25% will give you a nice, full, even finish and will make it easier to get the chips to show through when it comes to sanding. Mix them in and pour your mixture into your mould. You’d normally tap the mould as you go to help reduce air bubbles, but when working with terrazzo, this can make the terrazzo chips settle at the bottom of the mould. This is why we’d suggest tapping your mixing cup on your work surface before adding your terrazzo chips to eliminate air bubbles at an earlier stage.
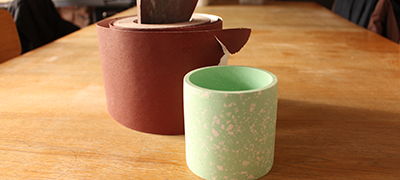
- Allow your piece to set for around 20-30 minutes then when it’s ready, carefully remove your piece from the mould. Place your finished piece on the mould to allow the air to circulate around it so that it can fully set.
You’ll notice you can’t really see the terrazzo chips in your creation at this stage. That’s how it’s supposed to be, and you’ll now need to move onto sanding to reveal your terrazzo chips and finish your creation. Get your strong arms ready and check out our blog on sanding to complete your terrazzo piece!
Have any questions about terrazzo or just need a little advice? We’re here to help, just drop us a message on WhatsApp (bottom right) and we’ll be happy to chat through anything you need.